Although Instagram has made a massive development push in recent years, filters have remained a crucial editing tool. The filters you use can quickly give your content and business a certain tone and visual style.
Before discussing how to access filters on Instagram, I’ll give some tips on how to use them. It doesn’t matter where you want to apply them – in posts, stories or videos.
First, make sure you choose filters that match the tone and style of your brand. For example, if you’re into vintage furniture, you might choose filters with a light yellow hue, without the saturated tones. That way you’ll give your content a distinctive, more antique look.
Or, if your brand, on the other hand, is ultra-modern, consider choosing filters that use a high-brightness blue hue.
You might want Instagram filters that emphasize your content.
For example, if you’re sharing posts about food, filters with high saturation and deeper contrasts that make food look more appetizing would be appropriate.
On the contrary, if your brand is focused on relaxation, filters with more muted colors and saturation will look harmonious. Such filters mimic a sense of calm. Avoiding a page block on Instagram, as well as on YouTube is not easy. Service Lowcostsmm – https://lowcostsmm.com guarantees you complete security in charging subscribers, views and likes.
Choose two or three filters that match your brand identity. Stick to them for all content. If you keep changing filters, your Instagram content will look disjointed. By using the same or similar style filters, however, you’ll create more cohesive content that looks unified in the feed and matches your brand style. When people see your posts, they will immediately associate them with your brand.
Now that you’ve learned how to use Instagram filters strategically, let’s look at how to add filters to posts, stories and videos.
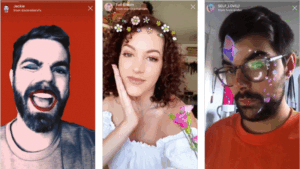
Table of Contents
How to manage filters in Instagram posts
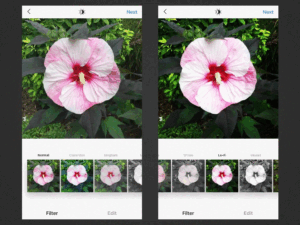
Whether you’re uploading photos or videos, the options for filters will be the same. You’ll encounter filter choices on the first edit page after selecting an image or video to upload.
Did you know that you can edit the location of these filters and add new filters to use? Swipe all the filters to the right until you reach “Manage”. Click it and you’ll see a list of available filters.
A checkmark next to a filter indicates it’s already been added to the Filter Editing screen.
Here you can change the organization of your filters by adding new ones or removing ones you don’t apply. To do this, simply uncheck or activate the checkbox.
You can also change the order in which filters appear on the edit screen. To do this, click on the two lines to the left of the filter preview and move the filter anywhere in the list. Note that you can only move one filter at a time.
Tip: For your convenience, I recommend placing the Instagram filters you use most often at the top of the list.
Once you’ve finished setting up your filter page, click the check mark in the upper left corner of the screen to save your changes and return to the edit page. Instagram will remember your settings, and the filters will appear in the order you configured each time you log in.
How to set filters for carousel posts
If you’re uploading a carousel post, you can also choose filters on the first page after uploading images or videos. You’ll notice that the filter preview is blurred here. This is how Instagram indicates that you are setting filters for all images and videos in the carousel.
If you agree to apply one filter to all images at once, select your favorite and it will be applied.
If you want to select filters for each photo or video individually, click on the particular creative and select the desired filter for it.
You can also make other changes at this stage. For example, adjust the saturation and brightness for an individual image or video. To do this, click “Edit” at the bottom of the screen and select the editing options.
When you’re finished adjusting, click “Done” to return to the carousel settings. Select the next creative if you want to adjust its filter. And so on.
Adjusting the intensity of the filter
You might not like certain Instagram filters because they change the image too much. The issue here is the intensity of the filter. You don’t usually use them at full intensity. Fortunately, Instagram lets you adjust the intensity of the filters you apply to your images.
Once you’ve selected a filter, click on it again to display the intensity slider. Simply drag the slider toward 0 to reduce the intensity of the filter.
How to manage filters in Instagram stories
Now let’s talk about filters for stories. When you add a photo or video to stories, you’re taken to the editing screen. This is where you can add stickers, write captions, and more. This is also where you can add filters.
Just swipe left or right across the screen. That way you’ll see how the filters on your image or video change for a story. As you scroll, you’ll notice the name of each filter.
Unlike posts in your Instagram feed, you can’t edit filters in stories. Just scroll through the list to find the filter you want to use.
Now you’re ready to customize your Instagram filters
Add Instagram filters to your posts, whether it’s a photo, a story or a carousel. Don’t forget to stick to your brand’s style and match your filters to your overall page design. Save time by editing your filters in a way that suits you.
Use two or three filters for your brand to keep a consistent page style.
To look at different masks on Facebook or Instagram, just go into photo mode and to the right of the photo button you’ll see several preset options and you can check out the user gallery if you want. Such masks seem like cute fun for selfie lovers, but in reality they’re a powerful marketing tool. Just 10 years ago such a statement could be perceived with skepticism. But today, Instagram and Facebook masks are one of the best ways to draw attention to your account.
How to create a mask in 10 minutes
Developing a mask for Instagram really doesn’t take much time. And if you don’t bother developing 3D effects, after reading the step-by-step instructions, 10 minutes will be enough to learn how to make them.
Step 1. Install Spark Ar Studio.
To do this, follow the link and click “Download” (a single button will easily download the program on Windows or Mac OS). Then register or log in through your personal Facebook page.
To make an Instagram mask yourself, click on the blue “Create project” button in the lower right corner.
For future reference, by clicking on “Open Project” you can open any existing project and continue editing it using the previously saved presets (settings). An additional tool can also be considered online services such as https://captainsmm.com. At Captain smm services for Telegram, Tik Tok and Instagram are inexpensive. See for yourself.
Step 2. Add face tracking
The tracking is a kind of prototype of a human face, you try on it for all the applied effects and check whether they appear correctly when the lips and cheekbones move, etc.
To add a “human model” to your workspace, click “Add object” on the left vertical toolbar.
In the window that unfolds, select “Face Tracker” and click “Insert”. The standard man from the program will appear.
Now all movements (head and face turns) will be fixed by the program. That is, the coordinate axes will appear on the prototype.
Step 3. turn on the grid
The grid is responsible for displaying the mask on the face. To enable it, click “Add object” on the left vertical toolbar, select “Face Mesh” and click “Insert”.
When the staggered grid appears on the tracker, pull on the colored arrows to adjust the size of the future mask.
At this step, you can make, for example, one eye closed, turn off the response to a smile, or swap the eyes and nose.
These settings are adjusted on the top right toolbar with the blue checkmarks.
Here you can “go wild” and create something very strange, but interesting. Think about the best way to make the mask work for your brand.
Step 4: Add material.
Material is the base, a kind of substrate, on which all the elements of the future effect will be attached.
To add a material, click on the plus sign next to Materials in the right vertical menu.
After that, the checkerboard box should get a glossy look, and the material footnote will appear in the left menu.
Next, we’ll use our imagination and add the necessary material parameters to our mask.
Step 5. Select the type of material
Click on “material” in the left menu. Then go to the right panel. It should display the “Shader Type” section. Click on the drop-down list next to this and select the desired material type:
- Flat – flat mask;
- Standard – standard glossy coating (used by default);
- Physically-Based – a lightly scuffed and rough surface is good for masks with light effects;
- Face Paint – applying paint on the mask. Suitable for creating makeup or tattoo effects;
- Blended – Combination of textures and effects, good for “half-human-half-animal” masks;
- Retouching – smoothing/changing the facial proportions (enlarge/reduce eyes, nose, lips).
Once you’ve added the right material, you can move on to adding textures. Get ready to unpack your picture suitcases.
Step 6: Apply Texture
Texture is what will appear on the user’s face in the end. You can upload any pictures, stickers, stickers, create a new filter in your insta collection. But don’t forget that the texture must match the type of material.
So, to add a texture, click on “material” in the left menu. Then go to the right menu and under “Texture” click on the arrow next to “Choose file”, in the dropdown list select “New Texture”.
Download any image from your computer. The picture will always be stretched over the entire surface of your face.
By the way. If you want the image to be placed only on the forehead or cheek, then edit it beforehand in any graphic editor.
That is, reduce the size, place it in the corner corresponding to a certain part of the face (for example, for the forehead – at the top of the screen), make a transparent background and upload the edited file.
Step 7: Test the mask
The easiest way to do this is to use the visual simulator. It is located in the upper right corner of the box.
In the drop-down list you can choose any mobile device and see how the effect will look on it.
If you want to test the effect on yourself, click the video camera icon in the left vertical menu and select “HP Webcam”. Your face will appear in the simulator.
Another option is to install the Spark AR Player mobile app on your phone and connect your smartphone with a USB cable to your computer. Then the effect will be displayed directly on the mobile screen.
After testing, download the new mask to your computer. To do this, click “File”, then “Export” and select a save location. The weight of the file must be strictly not more than 20 Mb.
Great, there is not much left – send the ready mask for moderation and check everything once again (to be sure).
Step 8. Submit it for publication
Moderation of masks takes place on the service Spark AR Hub. To upload a mask for moderation, on the Manage Effects tab, click the blue “Upload Effect” button.
Select the desired site to publish to – Facebook or Instagram, enter the name of the effect and click “Next”.
Now you need to create an icon, which will serve as a cover for the mask on the social network. It is important that the thumbnail reflects its main elements, but not an exact copy.
Important. Increase the quality of your coverage and work only with your live audience. Spam Guard will help you with this. The service will automatically clean your profile from bots, fakes and commercial accounts. Also, the promotional code “inscale” discount of 20%. Click and test for free -> SpamGuard
Allowed icon size from 200×200 to 700×700 px. Load the effect icon in the “Effect File” tab, then load the mask itself from your computer in the same tab. Click “Next.”
The system will prompt you to test the created mask again directly in the Instagram app. A preview of the effect will be available for an hour for your account only.
If everything is cool and you’re happy with it, upload a video demonstration in the next window. It’s easy to do from your phone in the Spark app with screen recording. Then submit the mask for verification.
Once verified, the mask will be posted on social media. Moderation of the effect usually occurs within one business day, in rare cases it can take up to five days.
Once published, you can find the results of your creation in your personal profile on the home page.
A little more patience and you will be able to see the fruits of your labor by referring to the statistics.
Step 9: Check the stats
When your new instagram mask starts to be used by your followers, statistics will open and you will be able to track its effectiveness. View the stats in Spark AR Hub under the “Insights” tab. There are three indicators available for viewing:
- Shows – how many times the mask was shown on Instagram;
- Snapshots – how many times users took selfies with the mask;
- Reposts – how many times followers have shared the mask in a post.
Congratulations, your creative ideas have come to fruition in the form of a cool effect. You can safely watch as more and more users share the mask you created for Instagram.
HOW YOU CAN USE IT
Now that you understand how easy it is to make a mask in Instagram, and already, hopefully, turned on the idea of creating your own, I will show you some interesting examples of how and where they can be used.
- For entertaining your audience.
Creative effects for Instagram posts by popular bloggers and artists are quickly spread across the social network audience and bring them new subscribers.
- For image promotions.
The cafe-cookery used their own masks to increase brand awareness. The idea of “pancake selfies” really appealed to customers.
- For PR events.
Glamour magazine presented a holiday mask to celebrate its 15th anniversary and received mentions in top media outlets. The magazine’s account now has a whole collection of masks.
- To interact with the audience
A Russian hockey club offered its fans to become hockey players with a mask and even to kick a puck (flying directly into the mouth). The authors of the most creative photos were given game tickets by the club.
- To find employees
One of the Russian TV channels used masks on instagram to search for correspondent candidates. The employer killed three birds with one stone: he saw the person, heard his voice and a mini business card.
- To cover social issues.
Advocates for the Domestic Violence Act launched a flashmob called “Yanehotelaumirate” and created special masks for stories on Instagram. This is the clearest example of raising important social issues.
By the way. If you want to promote your mask, you can do it through your storis, and for this I recommend the service – Instaplus.pro. With it you will increase the reach of stories up to 30%, which means you will “tweak” Instagram algorithms to suit you and be able to earn more. Click and test the service -> Instaplus.pro
Briefly about the main points
Uploading masks to instagram is one of the most affordable and easy to use promotion methods. Most users think that masks are a cool tool that everyone should unconditionally use (in conjunction with the rest of the methods).
However, not everything is as rosy as it seems at first glance. It is important to know and understand that masks are not only “cool”, but also “dangerous” for your account. I will tell you about this below.
– Pros.
- Masks allow you to promote not only themed personal blogs, but also large brands for free. In most cases, this is an effective method.
- Profile coverage. In the stories of users who use the mask, the name of its creator is visible in the upper left corner. Through clicks on the creator’s nickname, the mask spreads across the social network, which increases the profile’s reach;
- Viral effect. The obligation to subscribe to the mask’s author is a thing of the past, but the audience is accustomed to increasing the number of subscribers to the profile. And the growth of the audience happens without investment in advertising;
- Presentation of goods. You can use masks as, for example, mannequins. Give potential customers an opportunity to “try on” a new hairstyle or jewelry, which will help to increase sales;
- Interest in the brand. Make a name mask or add a native mention of the brand or elements that evoke associations with it. This will help in building user loyalty;
- Media exposure. The coolest masks can become featured media cases. Or you can offer them your own material, including for a fee. And links to the resource will increase interest in your project;
- A means of earning money. You can monetize the skills to create masks. For example, run courses on their creation “with their own hands” or make masks to order (now brands are often looking for such “masters”).
– Cons.
The use of masks in Instagram can go sideways if you do not know the other side of the coin. So I give a number of arguments not in favor of this tool.
- Falling Coverage. The “habit” of users subscribing can be a problem. Your users do not look at the content, they just hang in their list of subscribers, which reduces their coverage;
- Audience dispersion. Your masks may not only appeal to your target audience. The account may get subscribers who don’t lend themselves to the promotion strategy;
- Foreign users. In Russian accounts, Arab subscribers become a surprise. And advertisers perceive these people as bots (it is advisable to clean them);
- The cost of advertising. All previous items reduce the price of advertising, because the involvement of the profile falls, and you become uninteresting to advertisers.
- But don’t forget that now you don’t have to subscribe to the author’s account to use masks. When the majority of Instagram users learn about this, these problems will be minimized.